
At my workplace we use Azure DevOps Repos and Pipelines for our .NET software engineering process – and I wanted to use the same tooling for Power Platform development.
Microsoft provides Power Platform Build Tools however after experimenting I found I that the Power DevOps Tools by Wael Hamze offer more flexibility.
Wael introduces the tools in his YouTube video, Getting Started with Power DevOps Tools.
Wael's tutorial creates two Azure Pipelines. The first uses the Classic editor to conduct Continuous Integration and committing files to Git. The second pipeline is a Classic Release pipeline to import the solution into other environments.
The tutorial is very useful – I was able to replicate it in my own Azure DevOps instance very quickly.
Building upon this initial tutorial, I want my end-to-end process to include:
- Creating an Azure Boards user story for a requirement
- Implementing the requirement in the Power Platform Dev environment
- Triggering the Build Automation pipeline that:
- Ensures my changes are published
- Gives the solution a version number
- Exports the solution from the Dev environment
- Checks the solution for common issues
- Saves the changes into Azure Repos
- It would then trigger the Release Automation pipeline that:
- Uses the newly created build from the Build Automation pipeline
- Deploys it to the Test environment (where further automated testing could occur)
- Waits for approval from our Change Management team
- Then deploys into the UAT environment
- Lastly, both the Build and Release runs should be associated with the user story in step 1

Something else I wanted to alter from the Power DevOps tutorial was to use YAML rather than the classic pipeline editors, as they are now deprecated. YAML has the following benefits:
- It is version controlled in the repo with the source code
- It is easily copied to new pipelines
- It allows you to use parameters – which can be completed by the user when triggering a run
Set up an ALM app registration in Azure Active Directory
In the AAD portal I created a new app registration. Giving it a suitable name: Azure DevOps ALM.I then created a Client Secret for the app – essentially a password.
I made a note of the:
- Application (Client) ID
- Directory (Tenant) ID
- Client Secret value

Granted permissions in the Power Platform Environments
Next I granted permissions to the app registration so that it can export and import solutions.From the Power Platform Admin portal I chose Environment > Users > app users list.
I then created a new app user. In the Security Roles field I granted the System Customizer permission.

Set up Azure DevOps
Next, I installed the Power DevOps Tools from the ADO Marketplace.
I then created a new Azure DevOps Repo to hold the Power Platform solution exported from my Dev environment. Using the repo, I will be able to see future changes by diffing commits.
I then granted the necessary permissions to commit to Git by amending the Repo settings. I gave the "<project name> Build Service" account the Contribute permission.
Created Environments
Under Pipelines, I then created an environment for each of the deployment stages in my YAML file – in this case Test and UAT. I created a required Approval for the UAT stage. I decided I wanted to deploy automatically into my Test environment so did not set an approval for this environment.When my pipeline ran for the first time, I was prompted to give it access to each environment
Created a Build Automation Pipeline
Now it was time to create the first, Build (and Commit) pipeline. The YAML is on GitHub.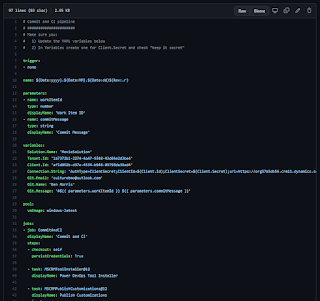
Outside of the YAML I created a Pipeline variable to hold the Client Secret – being sure to check: keep it secret
To make the YAML re-usable, I set variables for the dev environment connection string and for the solution name.
I also included a variable that concatenates two parameters for the Azure Boards work item ID and a commit message. These will be populated by the user at run time, when the pipeline is triggered.
I set the YAML name property to my preferred format (yyyy.MM.dd.rev) – this is used in the pipeline as BuildNumber
I added tasks for:
- Power DevOps Tools Installer
- Publish Customisations
- Set Version – using the BuildNumber
- Export Solution – both managed and unmanaged
- Solution Checker
- Publish artifact – the managed solution, so it can be used subsequently in the Release Pipeline
- Extract Solution – unzip the files from the unmanaged solution
- Command line task – to commit the unzipped files to Git
Created the Release Automation Pipeline
Next the second, Release pipeline. My multi-stage YAML pipeline is on GitHub.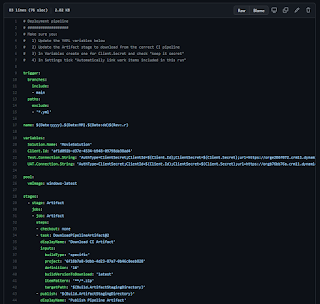
Again, I created a Pipeline variable to hold the Client Secret – being sure to check: keep it secret
I created variables in the YAML for the connection strings for each environment (Test and UAT), plus a variable for the solution name.
I then added the following stages:
- Artifact – with the following tasks
- Download Pipeline Artifact – the managed solution zip from the Build pipeline
- Publish Artifact – so that the solution is saved against the runs for this pipeline and can be accessed by subsequent stages
- Test
- Depends on previous stage to complete successfully
- Uses the environment name – for any approvals configured earlier when setting up Environments
- Downloads the Pipeline Artifact
- Installs the Power DevOps Tools
- Import the Solution into the Test environment
- UAT – with identical steps to Test
- Depends on previous stage to complete successfully
- Uses environment name – for any approvals configured earlier when setting up Environments
- Downloads the Pipeline Artifact
- Installs the Power DevOps Tools
- Import the Solution into the UAT environment
- Further environments, e.g. Production
- Copy the steps as per Test and UAT above

And that's it! When I need to check in changes from my Dev environment I run the Build pipeline. It prompts me to include the work item ID and a commit message. Then when I want to deploy changes to my Test, UAT and Production environments I run the Release pipeline.

Coming full circle I can see the commit and the release recorded against the user story. Nice work!

Comments
Post a Comment