It has been nearly 25 years since Microsoft last released Visual Basic. The first version came out in 1991, version 6 was released in 1998. And due to its popularity, VB6 applications are still in widespread use.
In my company, a VB6 application is the main LOB system used by an entire department.
During our latest laptop refresh we decided that my teams will run the company’s locked-down laptop image and will run on standard hardware. This pretty much stops us from doing our day-jobs as we currently run as local administrators on high-spec kit.
Instead, we’re going to run high-spec VMs in Azure and I’ve been creating some developer VM images so that my teams can get up and running quickly and don’t have to spend days building their new developer machine.
So, this means, for the team supporting the VB6 application, I needed to figure out how to install Visual Basic 6. This took a considerable amount of trial and error and plenty of time Googling. Below are the steps that worked for me on Windows 10 64-bit. These instructions also work on Windows 11.
You’ll also need a VB6 licence key.
When prompted choose a Custom install and then deselect:
Now deselect ADO, RDS, and OLE DB Providers. The installer will warn you that they are an essential part of the application. Don’t worry, we’re going to come back and install them later.
Now go ahead and Continue.
If you are installing on Windows 11 the installation will succeed and you can proceed to step 6.
However, on Windows 10 you will notice in the title bar that Visual Basic 6.0 Setup is Not Responding, the installation process has hung.
Open Task Manager and end the acmsetup.exe task.
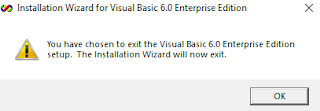
The installer will inform you that you have chosen to exit the installation, that's OK, stick with me!
As before, when prompted choose Custom Install and then deselect:
Now deselect ADO and RDS.
This time the installer will magically succeed!
Great, but we’re not done yet.
Choose to Add/Remove features, and this time, going into Data Access, you can install ADO and RDS
Again, you’ll need the files for this.
Instructions for installation are in this post.
I chose to extract the files to C:\VB6MouseWheel.
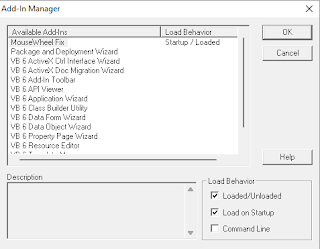
You’ll need to register the DLL, run up VB and then enable the Add-In.
And that’s it! This process is clunky and barely approved by Microsoft
But you should be able to compile your Visual Basic applications and party like it’s 1998!
***UPDATE***
Remember to also install KB2708437 - Microsoft Visual Basic 6.0 Service Pack 6 Cumulative Update
In my company, a VB6 application is the main LOB system used by an entire department.
During our latest laptop refresh we decided that my teams will run the company’s locked-down laptop image and will run on standard hardware. This pretty much stops us from doing our day-jobs as we currently run as local administrators on high-spec kit.
Instead, we’re going to run high-spec VMs in Azure and I’ve been creating some developer VM images so that my teams can get up and running quickly and don’t have to spend days building their new developer machine.
So, this means, for the team supporting the VB6 application, I needed to figure out how to install Visual Basic 6. This took a considerable amount of trial and error and plenty of time Googling. Below are the steps that worked for me on Windows 10 64-bit. These instructions also work on Windows 11.
1) Locate your installation media
The first step is to find the installers for Visual Basic 6 and Service Pack 6. Microsoft no longer offers them for download, so you must have the files saved somewhere or on an MSDN disc. I must admit, I had to do a bit of rummaging to find them!You’ll also need a VB6 licence key.
2) Alter registry permissions
We’re going to be installing VB6 as a local administrator. As per this article you’ll first need to take ownership of the HKEY_CLASSES_ROOT\RDSServer.DataFactory\Clsid registry key and then give your account Full Control.3) Begin the installation (setup take 1)
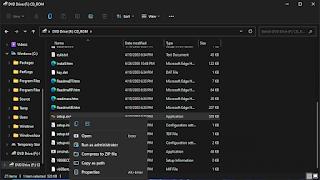
Now we can start to install. Right-click setup.exe and run as Administrator. You’ll see a warning from the Program Compatibility Assistant, ignore it.When prompted choose a Custom install and then deselect:
- Microsoft Visual SourceSafe 6.0
- Enterprise Features and Tools
Now deselect ADO, RDS, and OLE DB Providers. The installer will warn you that they are an essential part of the application. Don’t worry, we’re going to come back and install them later.
Now go ahead and Continue.
4) Kill the installer (Windows 10 only)
The installer will copy files and will then display a screen saying that Setup is updating your system.If you are installing on Windows 11 the installation will succeed and you can proceed to step 6.
However, on Windows 10 you will notice in the title bar that Visual Basic 6.0 Setup is Not Responding, the installation process has hung.
Open Task Manager and end the acmsetup.exe task.
The installer will inform you that you have chosen to exit the installation, that's OK, stick with me!
5) Run the installer again (setup take 2)
Right-click setup.exe and run as AdministratorAs before, when prompted choose Custom Install and then deselect:
- SourceSafe
- Enterprise Features and Tools
Now deselect ADO and RDS.
This time the installer will magically succeed!
Great, but we’re not done yet.
6) Complete the installation (setup take 3)
Now navigate to C:\Program Files (x86)\Microsoft Visual Studio\VB98\Setup\1033 and run setup.exe again. Alternatively, you can modify components from Control Panel > Uninstall a program > Microsoft Visual Basic 6.0 > Uninstall/ChangeChoose to Add/Remove features, and this time, going into Data Access, you can install ADO and RDS
7) Run up Visual Basic for the first time
You can now run up VB – but make sure you Run as Administrator the first time. The familiar IDE should open just as you remember it.8) Install Service Pack 6
Make sure you also install the last service pack, SP6. Compared to the latest versions of Visual Studio it’s quick.9) Install the Mouse Wheel fix
Lastly, I chose to install Microsoft’s mouse wheel extension, because who doesn’t want to scroll within their IDE?Again, you’ll need the files for this.
Instructions for installation are in this post.
I chose to extract the files to C:\VB6MouseWheel.
You’ll need to register the DLL, run up VB and then enable the Add-In.
And that’s it! This process is clunky and barely approved by Microsoft
But you should be able to compile your Visual Basic applications and party like it’s 1998!
***UPDATE***
Remember to also install KB2708437 - Microsoft Visual Basic 6.0 Service Pack 6 Cumulative Update


Comments
Post a Comment